

'Take some more tea,' the March Hare said to Alice, very earnestly.
'I've had nothing yet,' Alice replied in an offended tone, 'so I can't take more.'
'You mean you can't take LESS,' said the Hatter: 'it's very easy to take MORE than nothing.'
- 'Alice's Adventures in Wonderland', Lewis Carroll
That above is one of my favorite quotes, from one of my favorite scenes in all literature. There is something about the ridiculousness of the Hatter and the Hare that appeals to me, it must be my silly side making itself known, and it is the fact that the ridiculousness is in fact very true.
Now because I love the mad tea party so much, for my second silver clay project I decided a tea cup and saucer would be perfect. It is also something which is very me (I have a thing about afternoon tea, for my 16th birthday I wanted a full tea service, nothing else, just a pretty antique tea service, I finally got one when I turned 18) and so is something which I can relate to in a number of ways and any items I would make regarding it would have multiple references for myself. To make the set more 'Mad' however I also decided to bring in the 'eat me, drink me' thing, so there is a bite out of the cup, cool yes?
Now on to the pictures! (Note: My camera died while I was doing this and the clay dried quickly so some images are of the saucer and some are of the cup)
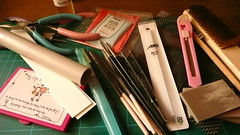
First up, the tools required for using silver clay, now not all of these are necessary for every project, but a lot of them are essentials, in this picture we have craft knives, clay shapers, files, rollers, sanding pads, pliers, burnishers, and wire brushes among a couple of other bits and bobs. I got the basics in a set which was around £30 which I ordered from here, but a lot of other stuff I simply got from my local craft shop and other online retailers, such as basic jewelry findings and jump rings and pliers and things. I am going to be making another ring in the near future and for that you would require a couple of extra things and I will show you those when the time comes.
Now, the actual clay. I use Art Clay Silver 650 in the Slow dry version. The slow dry part is very important because I am not very good at managing to quickly do what I want to do to manipulate the clay and so this significantly extends the working time I have. I also have to keep the clay moist with a water pen while I am working. The clay comes in packets like this:
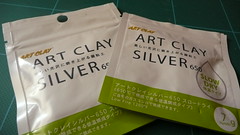
These are 7g packets, and when you open it you may think that there isn't much clay for what you pay (around £8/9) but I made my first ring with less than 7g so it goes a long way. You can buy in 7g, 10g, 20g, and 50g weights and prices are a little over £1 a gram, which I believe is reasonable.
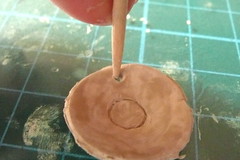
Now on to the making. I have missed a stage in the pictures here because it came out blurry, but the first stage is to grease your hands and tools with vaseline and then roll put the amount of clay you want to use, now you can use special spacers or playing cards (or naughty fairy cards as I have) to get the right thickness for your clay, there are lots of instruction books that have projects with specific thicknesses, I just rolled this to a few cards deep. I then took my eyeglass cleaner lip (i didn't have the nifty cutters I have now at the time) and cut out a circle with it, using it like a cookie cutter.
This formed the round shape for my saucer. I then took a cocktail stick and marked a ring in the middle and made a hole for the jump ring to go through, while I was doing this I had to keep moistening the clay, and it did crack a little around the edges, but I am going for an antiqued effect with these, they have survived the mad tea party, so I didn't mind too much.
I then placed a pen in the center circle and started to lift the edges with a shaping tool and give it some depth. After this I left the saucer to dry overnight and moved onto the cup.
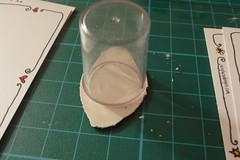
The cup was made in much the same way, I rolled out a circle, except for this i had previously molded some polymer clay into a dome shape to put the clay around to make it curved inside, After I had shaped it around the polymer clay i then rolled two sausage shapes and using some water to make it adhere well I put one on the bottom in a loop for the base and I made one into a handle.
These were left overnight until they were completely dried out, it is very important that you don't try to fire them when they are still damp because it simply wont work!
Part II, preparing for firing will be up later :D
(Edit: I am posting parts 2, 3 & 4 at intervals throughout the day with an hour or so in between so that you can read them in order without going down 4 posts and reading up the page!)
No comments :
Post a Comment
Note: only a member of this blog may post a comment.