Image Map

Thursday 25 August 2011

OCD


So I think i mentioned in my storage video that I wasn’t quite happy with how much everything is just shoved into some of the boxes I use for storage, and the other day when I was taking one of my mini breaks from doing work I broke out my hot glue gun and started making some dividers!


So I made 3, well I cut one and then cut two that slotted together. I made them from more notebook covers. It probably seems odd to use notebook covers but the plastic is just thick enough to stand up but not too thick to cut etc. They are actually stronger then the inserts I bought for my desk drawer.


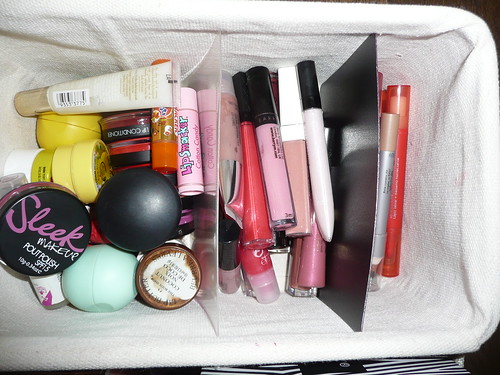
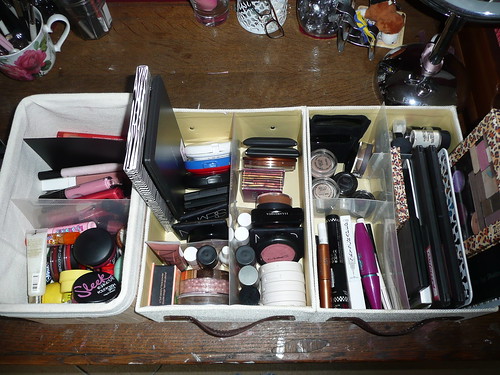
This is the first one, I moved my blushers to one of the lidded boxes (which I removed the lid from) and popped my lip glosses, lip balms and lip stain/pencil shaped lipsticks into this bucket style box with two plastic dividers.


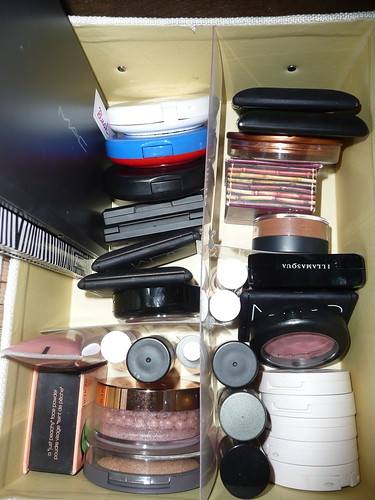
This is where I moved my blushers to, I just made a slotted divider, and glued it securely with the hot glue. I separated them all into powder blusher, bronzer, highlighters and then cream blushers. Let me tell you, it is so much easier to find what I want like this! There is more space for the products and although they were neat before I was separating them based on size rather then product. I also much prefer having removed the lid as I can now just grab things easily.


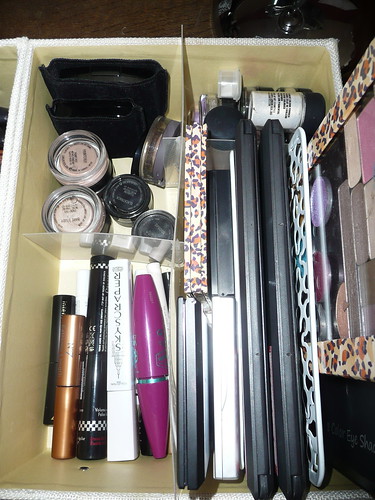
And here are the eye products, obviously here the letter stand separates in its own way but I still made a section for that so that if I took it out I would still have a designated space which I could use for something. At the moment though I haven’t room for the rack anywhere else so It is living in the box. I also love that I now have my pigments/glitter dusts separated out. They were always a pain to store because of their shape.
Needless to say my OCD side is much happier with things organised this way, and it was a good way to fill my break from doing uni work (I try to make sure I am away from the computer for those because I am getting serious headaches!) so I felt all productive and creative in a different way for a while.
xo


Monday 22 August 2011

Top Pout: Revlon Peach


Revlon Colorburst Lipstick in Peach (Spelt the american way, for searchability)
There was a totally hilarious pouting picture to accompany this post, but It was blurry, such a shame as it was hilarious!


Anyways, so.
Let me take you on a journey. There was a girl who last winter/spring decided she wanted to try a peach lipstick, she had a major search around for peach lippies, as she didn’t own any previous to this and tried very many. She purchased a few (which she still loves, just not as much as this), and still hadn’t quite found her perfect match. Then spotted this on one of the many blogs she followed, popped along to Superdrug and fell in love. Awww. 
Obviously, that was me! I think this may be my favourite peach/orange lipstick ever. Simple. 
At around £8 this is definitely the cheapest of the many peach lipsticks I tried, and the shade is definitely the most flattering for my skin tone. It makes me look lightly tanned and ‘finished’ when I’m not, and can take me from ‘bit of a mess really’ to ‘boho/beach chic’ with one swipe. I. LOVE. IT.


The problem? I cannot figure out how. Normally I can be like “oh yes that particular undertone there works wonders on this feature of my mug and makes me look fabby,” but this one, it doesn’t just makes me look good, it also makes me feel good which may help. There is something about Peach which makes me feel relaxed and chilled and happy and makes me want to pull funny faces at the camera and be miffed when they turn out blurry.
The formula of this lippy is also fab, nice and moisturising it is great for keeping lips soft and doesn’t dry them out. This does however mean that it falls into the melts and snaps easily category. In fact it did just that while I was swatching. Boooo! 
Anyways, bottom line, this is a fab summer lippy (and I shall be buying another one just in case Revlon decides to stop making them. I like to be prepared) and I cannot wait to see how it does over autumn/winter, the tone of the peach is just rusty enough that I think it will carry well through autumn. Fingers crossed!
xo


NOTD: Nail Envy


OPI Nail Envy for sensitive and peeling nails.


So this is why I haven’t had any NOTD pictures lately, my nails have been a mess ever since I tried to use up my Sally Hansen Hard as Nails. That stuff completely ruined them, they peel and flake like mad now so I am giving them a break and using some trusty Nail Envy to try and get them all nice again.
This is the first time I have used this one, I used to use the original Nail Envy exclusively. The price may be astronomical (and it has risen since I bought my last bottle, by about £4!!!) but I really do think that this stuff helps.
XO

Saturday 13 August 2011

Makeup Collection/Storage


Makeup collection storage!!
I have been meaning to do this for literally ages now, and had to film it in two parts so it is pretty long. I wanted to film it because I found when looking for storage ideas most of the videos were from the US and had some sort of plastic or acrylic element to it, which doesn’t suit my antiques and classic decor of my bedroom.
I hope you find it interesting, and you kinda get a quick look at the sort of things I have in my collection :)
xo

Thursday 11 August 2011

Current Tinted Moisturiser Routine


My current tinted moisturiser routine.
I have been meaning to do this for so long, and I think I even attempted it once with my old camera but it sucked. Hopefully this time it is clearer and you will just generally get an idea of what I like to use at the moment :)
xo

Roaccutane VLOG 10: Skincare Routine!


Roaccutane VLOG 10: Skincare routine and weeks 9&10
Here is my current skincare routine, and one I would recommend considering if you are undergoing treatment :)
xo

Wednesday 10 August 2011

NOTD: Knotted Leopard Below Deck!


China Glaze Knotty,

China Glaze Below Deck,

Star Nails black art pen.
A few days (and a long shift fitting shoes on children) wear on these, but this is the leopard print look I did the other day. It was really simple, I just blobbed the darker colour on randomly and then outlined with the nail pen in a few different ways. I found it looked better if the black lines were a bit blobby too, and went back and made them less neat!
I really quite liked this neutral version, so it might just pop up again!! 
XO

Sunday 7 August 2011

Top Pout: MAC Innocence Beware


MAC Innocence Beware.
This is my favourite pinky nude lipstick, and I hate hate hate that it is limited edition!!

The shade was part of the Venomous Villains collection in collaboration with Disney and I was lucky and got the last one at my counter, if there had been more I might have grabbed a back-up, but there wasn’t.

Because this is limited edition it does mean that I am reluctant to wear it, which is such a shame as it is a perfect shade for me, it looks like I have a lipstick on but doesn’t look too nude nor too pink. It tends to lean towards more of a pink tone with my pigmented lips behind it as opposed to a blank nude, but I find that adds some dimension, as it can look either bugglegum or pastel, right down to a more flesh tone pink depending on the light. It really is a very subtle colour that just seems to adapt nicely.

The formula is a cremesheen, which is my favourite formula in MAC lippies despite its lack of staying ability, and so I know that if this wasn’t an exclusive shade, I would wear it near enough every day. Instead I have to make do with creme cup and other similar shades instead.
If you ever have the opportunity to grab one of these, at least give it a swatch on the lips, you will be surprised!
xo

Friday 5 August 2011

NOTD: French Kisses in Alpine Snow


OPI A Kiss on the Chic (LE)
OPI Alpine Snow


So I tweeted about this a few days ago but only just got around to posting on it. As you know I love painting my nails all different colours, but the other day I had an urge to French tip them! I did these free hand with none of those fiddly strips as I always do my tips, and I find that rolling the nail as opposed to moving the brush makes it very easy, especially if you have reasonably square nails like mine. 
I also make sure to do two coats of both the tip colour and flesh tone, just to make sure they look really polished and pretty!


I picked up a new nail pen the other day so I will be back to wacky nails again soon I imagine!
Xo